Home > Press > Engineers point way to better use of nanotubes as measuring tips
Abstract:
Imaging Artifacts in Atomic Force Microscopy with Carbon Nanotube Tips
Engineers point way to better use of nanotubes as measuring tips
October 11, 2005
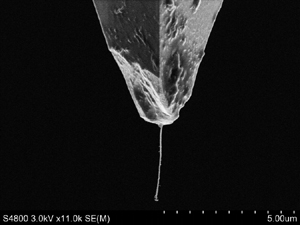
Engineers at Purdue University have shown how researchers might better use tiny hollow fibers called "multi-walled carbon nanotubes" to more precisely measure structures and devices for electronics and other applications.
Findings will appear in the November issue of the journal Nanotechnology.
Researchers attach the tubes to the ends of imaging instruments called atomic force microscopes. Because the tubes are long and slender, their shape is ideal for the emerging field of "nanometrology," which is precisely measuring structures on the scale of nanometers, or billionths of a meter.
Conventional silicon tips used on the microscopes are shaped like inverted traffic cones. They are fine for measuring relatively flat surfaces, but they do not readily penetrate crevices that often exist in tiny devices and structures, said Arvind Raman, an associate professor of mechanical engineering at Purdue. The silicon tips also wear out quickly, reducing image resolution, whereas the carbon nanotubes have been shown to retain their accuracy after many hours of use, said mechanical engineering doctoral student Mark Strus.
But while nanotubes better penetrate the nooks and crannies of nano-structures, the flexible tubes often stick to the sides of these structures due to attractive forces between individual atoms called van der Waals' forces.
"An example I give students is that operating in a nanoscale environment is like having flypaper everywhere because of the attraction of van der Waals' forces," Raman said. "These short-range, inter-atomic forces are very relevant on this size scale because a nanometer is less than 10 atoms wide."
Researchers use nanotubes as probes by inducing a vibration in a portion of the microscope assembly called a microcantilever.
"The microcantilever, which does all of the surface sensing, can be thought of as a very small oscillating diving board on which the silicon tip and nanotube are mounted to the free end," Strus said.
As the microcantilever vibrates, the nanotube tip comes close to the surface but never actually touches the object being imaged. The closer the tip comes to the surface, the more powerful the attractive van der Waals' forces become. The increasing attraction causes changes in the vibration pattern of the oscillating microcantilever, and the changing pattern is carefully monitored to reveal precise changes in contours on the surface of the object, yielding an image.
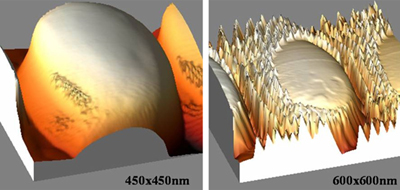
The same forces that enable the technology to work, however, also cause the sticking action of the probe. The vibrating tip sticks to the sides of the object being imaged, producing "artifacts," or inaccuracies in the measurements and images.
Strus has led research aimed at oscillating the probes in a manner that prevents nanotubes from sticking to structures, and new findings could lead to more accurate measurements using the slender probes. The journal paper was written by Strus, Raman, C-S Han, senior research manager from the Nanomechanical Systems Research Center at the Korea Institute of Machinery and Materials, and C.V. Nguyen, a research scientists from the NASA Ames Research Center in Moffett Field, Calif.
Methods to precisely measure structures on the scale of nanometers will become essential as nanostructures are used more often in applications such as computer chips, advanced sensors, microscopic machines and the creation of new materials. Precision measurements will be critical for developing new standards needed to properly develop, study and manufacture products based on nanotechnology.
Although some researchers are using nanotube tips in place of conventional silicon tips, the technique is still being perfected and has not yet reached widespread commercial use.
"One of our points in this paper is that you can avoid getting these artifacts if you know how to set the parameters," Strus said. "For example, you can change your set point or your amplitude and still get a good image with your nanotube."
The researchers showed precisely how artifacts are created by the sticking nanotubes, which are about 25 nanometers thick. The researchers also have shown how to avoid these artifacts by adjusting operating parameters of the microscope to prevent the tube from sticking.
One way to decrease the sticking is to increase the amplitude, or how far the probe moves each time it vibrates across the surface. With each oscillation, the tube sweeps close to the surface of the object and then swings in the opposite direction, constantly repeating the motion. As the vibrating probe sticks to the sides of a structure, the microscope's computerized controller pulls the tip farther from the surface. Then, after the tip is pulled away, it starts vibrating normally again, and the controller repositions it closer to the surface, again resulting in the sticking action. This cycle repeats, causing the image artifacts.
The researchers demonstrated how to prevent several specific types of artifacts while using nanotubes to take images of tiny tungsten posts about 100 nanometers in diameter and other nano-structures.
The research was funded by the Centre for Nanomechatronics and Manufacturing in South Korea, and the work is associated with Purdue's Birck Nanotechnology Center, which is part of Discovery Park, the university's hub for interdisciplinary research.
Writer:
Emil Venere, (765) 494-4709, venere@purdue.edu
Sources:
Arvind Raman, (765) 494-5733, raman@ecn.purdue.edu
Mark Strus, (765) 496-6416, mstrus@purdue.edu
Related Web sites:
The journal Nanotechnology
Arvind Raman
Contact:
Purdue University
News Service
400 Centennial Mall Drive, Rm. 324
West Lafayette, IN 47907-2016
(765) 494-2096
fax: (765) 494-0401
purduenews@purdue.edu
Copyright � Purdue University
If you have a comment, please Contact us.
Issuers of news releases, not 7th Wave, Inc. or Nanotechnology Now, are solely responsible for the accuracy of the content.
| Related News Press |
Nanotubes/Buckyballs/Fullerenes/Nanorods/Nanostrings/Nanosheets
![]() Tiny nanosheets, big leap: A new sensor detects ethanol at ultra-low levels January 30th, 2026
Tiny nanosheets, big leap: A new sensor detects ethanol at ultra-low levels January 30th, 2026
![]() Enhancing power factor of p- and n-type single-walled carbon nanotubes April 25th, 2025
Enhancing power factor of p- and n-type single-walled carbon nanotubes April 25th, 2025
![]() Chainmail-like material could be the future of armor: First 2D mechanically interlocked polymer exhibits exceptional flexibility and strength January 17th, 2025
Chainmail-like material could be the future of armor: First 2D mechanically interlocked polymer exhibits exceptional flexibility and strength January 17th, 2025
![]() Innovative biomimetic superhydrophobic coating combines repair and buffering properties for superior anti-erosion December 13th, 2024
Innovative biomimetic superhydrophobic coating combines repair and buffering properties for superior anti-erosion December 13th, 2024
Announcements
![]() A fundamentally new therapeutic approach to cystic fibrosis: Nanobody repairs cellular defect April 17th, 2026
A fundamentally new therapeutic approach to cystic fibrosis: Nanobody repairs cellular defect April 17th, 2026
![]() UC Irvine physicists discover method to reverse �quantum scrambling� : The work addresses the problem of information loss in quantum computing system April 17th, 2026
UC Irvine physicists discover method to reverse �quantum scrambling� : The work addresses the problem of information loss in quantum computing system April 17th, 2026
Tools
![]() Metasurfaces smooth light to boost magnetic sensing precision January 30th, 2026
Metasurfaces smooth light to boost magnetic sensing precision January 30th, 2026
![]() From sensors to smart systems: the rise of AI-driven photonic noses January 30th, 2026
From sensors to smart systems: the rise of AI-driven photonic noses January 30th, 2026
![]() Japan launches fully domestically produced quantum computer: Expo visitors to experience quantum computing firsthand August 8th, 2025
Japan launches fully domestically produced quantum computer: Expo visitors to experience quantum computing firsthand August 8th, 2025
|
|
||
|
|
||
| The latest news from around the world, FREE | ||
|
|
||
|
|
||
| Premium Products | ||
|
|
||
|
Only the news you want to read!
Learn More |
||
|
|
||
|
Full-service, expert consulting
Learn More |
||
|
|
||


